Pine64 Star64
The Star64 is a RISC-V SBC by Pine64 based on the StarFive JH7110 SoC. Check the Pine64 Wiki for details.
| Platform | Pine64 Star64 |
| Architecture | RV64GBC, RV64IMAC, RV32IMAFBC |
| System-on-chip | StarFive JH7110 |
| CPU | U74-MC, E24 |
| seL4 virtualisation support | – |
| seL4 SMMU support | – |
| Proofs | – |
| Proof configs | – |
| seL4 CMake platform name | star64 |
| Contributed by | Community |
| Maintained by | seL4 Foundation |
The StarFive JH7110 SoC is comprised of the SiFive U74-MC (four 64-bit U74 cores and one 64-bit S7 core) and one SiFive E24 32-bit core. Note that by default seL4 is setup to use the U74 cores as neither the S7 or E24 core has S-Mode, which seL4 requires.
The Star64 arrives with the following boot process from the SPI flash:
- U-Boot SPL starts
- OpenSBI starts
- U-Boot proper starts
From U-Boot proper you can then load and start an seL4 image, see below for details.
Building the GCC toolchain
It is recommended to build the toolchain from source.
git clone https://github.com/riscv/riscv-gnu-toolchain.git
cd riscv-gnu-toolchain
git submodule update --init --recursive
export RISCV=/opt/riscv
./configure --prefix="${RISCV}" --enable-multilib
make linux
After it is built, add the $RISCV/bin folder to your PATH. The built
toolchain works for both 32-bit and 64-bit.
Alternatively, any pre-built toolchain with multilib enabled should work.
Building seL4test
Checkout the sel4test project using repo as per seL4Test
repo init -u https://github.com/seL4/sel4test-manifest.git
repo sync
mkdir cbuild
cd cbuild
../init-build.sh -DPLATFORM=star64 -DRISCV64=1 -DUseRiscVOpenSBI=OFF
# The default cmake wrapper sets up a default configuration for the target platform.
# To change individual settings, run `ccmake .` and change the configuration
# parameters to suit your needs.
ninja
Generated binaries can be found in the images/ directory.
Booting via microSD card
fatload mmc 1 0x60000000 sel4test-driver-image-riscv-star64
go 0x60000000
Booting via TFTP
If you have setup a TFTP server, enter the following commands on the U-Boot console to load an image via the network.
dhcp
tftpboot 0x60000000 <YOUR_TFTP_SERVER_IP_ADDRESS>:sel4test-driver-image-riscv-star64
go 0x60000000
Producing a SD card bootable image
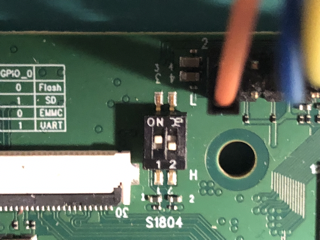
If you require a custom U-Boot or have other constraints, you may need to create your own bootable image. The following instructions show how to make a bootable image for a microSD card that can then be inserted into the Star64. Note that you will need to change the booting mode via the DIP switch, like so:

The boot process of this bootable image is the same as the SPI flash booting process. Unfortunately, at the time of writing, U-Boot does not support booting in M-Mode which means U-Boot must be loaded by an SBI in S-Mode.
Acquiring sources
At the time of writing, mainline U-Boot does not support the Pine64 Star64, hence if you want to built it yourself, there is a patch to apply available on a fork of U-Boot. Note that these instructions are reproduced from here.
git clone https://github.com/Fishwaldo/u-boot.git --branch Star64
git clone https://github.com/riscv/opensbi.git
git clone https://github.com/starfive-tech/soft_3rdpart.git
Compiling U-Boot and U-Boot SPL
CROSS_COMPILE=<RISCV_TOOLCHAIN> make -C u-boot pine64_star64_defconfig
CROSS_COMPILE=<RISCV_TOOLCHAIN> make -C u-boot
Compiling OpenSBI
Now that we have U-Boot, we can make the OpenSBI image that contains U-Boot as the payload.
mkdir -p opensbi_build
make -C $OPENSBI PLATFORM=generic \
                    CROSS_COMPILE=<RISCV_TOOLCHAIN> \
                    FW_FDT_PATH=u-boot/arch/riscv/dts/pine64_star64.dtb \
                    FW_PAYLOAD_PATH=u-boot/u-boot.bin \
                    PLATFORM_RISCV_XLEN=64 \
                    PLATFORM_RISCV_ISA=rv64imafdc \
                    PLATFORM_RISCV_ABI=lp64d \
                    O=opensbi_build \
                    FW_TEXT_START=0x40000000 \
Now we need to take the payload and turn it into a Flattened uImage Tree (FIT) for U-Boot SPL to load.
First we’ll need an ITS file to describe the FIT:
/dts-v1/;

/ {
    description = "U-boot-spl FIT image for JH7110 Pine64 Star64";
    #address-cells = <2>;

    images {
        firmware {
            description = "u-boot";
            data = /incbin/("opensbi_build/platform/generic/firmware/fw_payload.bin");
            type = "firmware";
            arch = "riscv";
            os = "u-boot";
            load = <0x0 0x40000000>;
            entry = <0x0 0x40000000>;
            compression = "none";
        };
    };

    configurations {
        default = "config-1";

        config-1 {
            description = "U-boot-spl FIT config for JH7110 Pine64 Star64";
            firmware = "firmware";
        };
    };
};
Now, invoke the mkimage tool to generate the FIT.
mkimage -f <ITS_FILE> -A riscv -O u-boot -T firmware opensbi_uboot_fit.img
Add SPL header to U-Boot SPL binary
First we need to compile a small tool that adds the SPL header to the U-Boot SPL image.
cd soft_3rdpart/spl_tool
make
Now invoke the tool on the U-Boot SPL image:
spl_tool -c -f u-boot/spl/u-boot-spl.bin
You should now have a file called u-boot-spl.bin.normal.out.
Generate bootable image
Lastly, we need to create the bootable image from all of these binaries. For this
the genimage tool is used.
First, we’ll need the configuration file. Note that you will have to change the paths to match where you build each binary.
image sdcard.img {
    hdimage {
        gpt = true
    }

    partition spl {
        image = "/path/to/u-boot-spl.bin.normal.out"
        partition-type-uuid = 2E54B353-1271-4842-806F-E436D6AF6985
        offset = 2M
        size = 2M
    }

    partition uboot {
        image = "/path/to/opensbi_uboot_fit.img"
        partition-type-uuid = 5B193300-FC78-40CD-8002-E86C45580B47
        offset = 4M
        size = 4M
    }
}
Now we can pass this configuration, a temporary directory path, and a root directory path to the genimage tool.
# genimage expects these directories to exist before invoking it
mkdir -p temp
mkdir -p root
# <INPUT_PATH> represents the top dir from where the genimage tool looks for
# the image paths in the configuration file
genimage --config <GENIMAGE_CONFIG> --inputpath <INPUT_PATH> --tmppath temp
The final image will be images/sdcard.img. You can either use the dd utility
or the balenaEtcher program to write the image to
your microSD card.